


Life Lessons from The Mind Game (Part 2)
Welcome back. If you’ve been following along with my last post, you’ll have noticed the secrets I divulged about the overview of the exact path I followed, deep-diving into my success. It’s all in the mind, which is why I call the course that this 2-part series is based upon The Mind Game.
Here in Part 2, I introduce you to the ‘meat and potatoes’ of the background actions I took (and still take!) to anchor in the success that led me to earning tens of millions of dollars per year.
Lesson 7: Getting SMART

Much of what we’ve been building up to in the last post leads into what we’re talking about here today.
What I want to share with you is a process that you can use to flesh out a goal for five years, a goal for one year, and a goal for 10 weeks, and the 10-week goal in particular will be what we build upon and use to build an action plan in the rest of this post. Ten weeks is 70 days, and that’s plenty of time to really move the needle and get things happening in an online business.
That’s the good news: when we align the five-year goal, the one-year goal, and the 10-year goal, the idea is that they’ll be like dominoes.
When you get the 10-year objectives achieved, that will knock on to the next objective, which will be the 1-year goal, and so on and so forth. I’m a big fan of the SMART acronym when it comes to setting objectives because it guides me through what or how those objectives should be framed.
The acronym SMART stands for specific, measurable, attainable, relevant, and time-based. So a five-year goal could be something like this: “On January 1, 2028, I’ve built a lifestyle business that earns me $100,000 per month in profit that I can run on just one hour of work per day.”
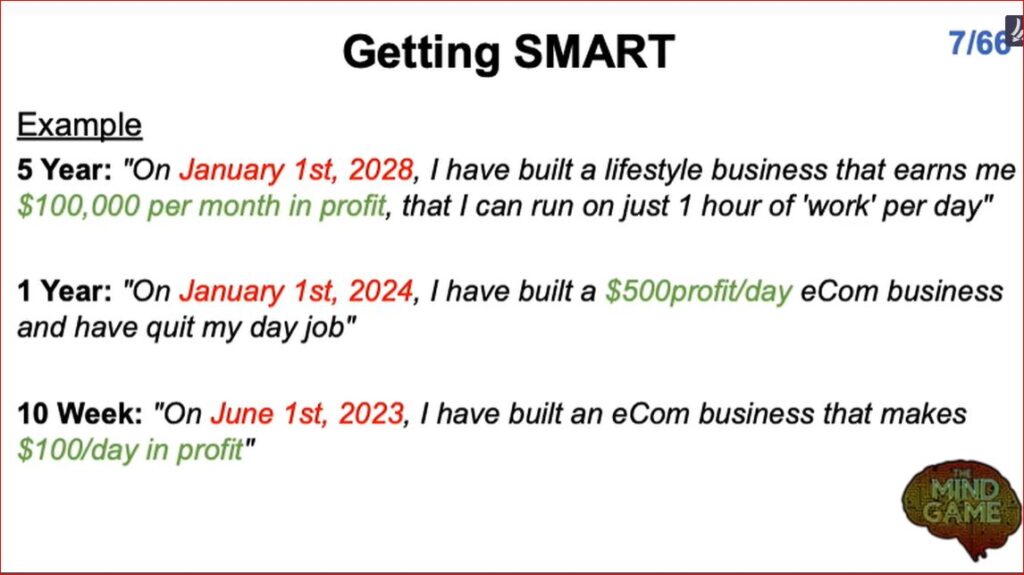
Then we can flow on to a one-year goal: “On January 1, 2024, I built a $500 profit per day business.”
In the tenth week using this example, the date would be the first of June 1st, 2023, where “I built an e-commerce business that makes me $100 in profit per day.” Now, these dates are just examples.
What we’ve highlighted here in red are the specific times. So, if you remember, part of the objective was to use a specific, measurable, and time-based. So it is specific; it is measurable. The green parts are clearly measurable. The red parts are all time-based. It’s also attainable. These are attainable goals in this kind of timeframe, and they are relevant to our goals.
The action item for you today is to write out a goal for five years, for one year, and then for 10 years. I would do it in that order.
Start with the fifth-year objective, and feel free to think a little bit bigger here, because five years is quite a long time. Most people underestimate what they can do in five years. Then make sure the one-year goal aligns with that goal, and then the 10-week goal aligns with that goal as well. Add these to your notebook.
A little tip here: what I like to do once I’ve got an aspirational five-year goal is put it on a little piece of paper, fold it up, and keep it in my wallet. Even when I just see that piece of paper in my wallet without even unfolding the paper to see what it says, I know it’s about my aspirational goal, and it just keeps that at the forefront of my mind.
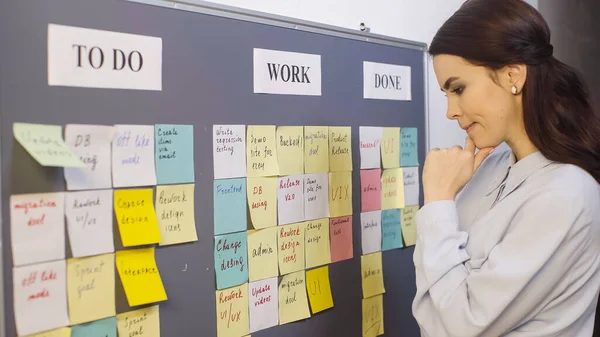
Lesson 8: The Planning System

Welcome to lesson eight of the Mind Game. In this lesson, we’re going to build on what we started doing in the last lesson, which was setting some goals, and what I really want to talk about here is a planning system—a way that you can take your goals and then build a plan to systematically be able to achieve them.
We talk about building a critical path This is the project management tool.
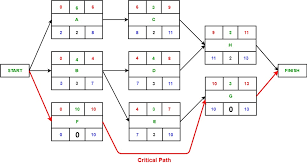
This is a textbook image—the kind of thing that they teach in universities. In fact, this is what I learned when I was studying production management.
But there’s a much simpler way of doing it, and all you really need to do is understand the resources that you’ve got at your disposal, the time that you’ve got at your disposal, and set up a series of tasks that are essentially like dominoes. Complete the first one, then the next one gets done, and the next one gets done, and that gets you to the end result in the most optimized, streamlined, and seamless way possible.
We can set an objective for 10 weeks from now, or multiple objectives that you can pursue and multiple goals that you can achieve in 10 weeks. I like to think of about three to five different goals in my life, set them up, and then build the system around them.
This planning system, this 10-week critical path, is what we’re going to be building over the next few lessons. What I want you to remember is that you can keep this simple. A lot of people like to overcomplicate this, but this is the kind of thing you can do on the back of a napkin.
You don’t have to have sophisticated software. You don’t have to build anything that looks like a complex critical path model. You really can keep it simple.
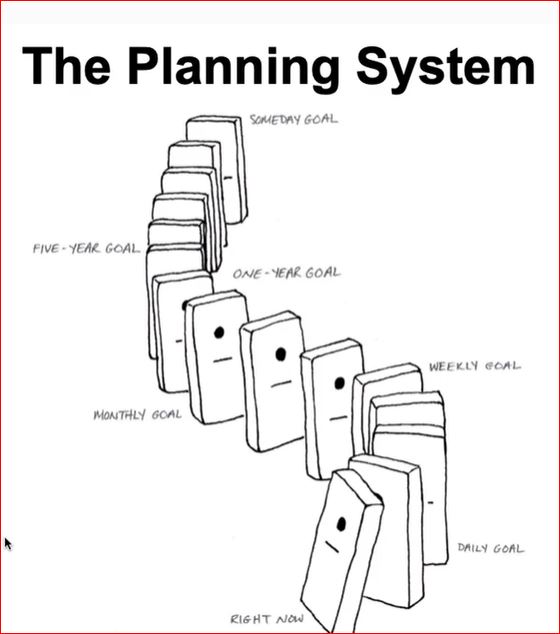
Let’s have a bit more of a look at this: This domino image that you’re seeing here is the best representation of how to align your Sunday goal with a five-year goal, a one-year goal, a monthly goal, a weekly goal, a daily goal, and right down to the tasks that you’re doing right now.
What we’re doing over 10 weeks—10 weeks is just under three months—we’re trying to get some of these dominoes falling down on top of one another so you can start making progress towards the end goal.
This image is taken from this book, The One Thing, by Gary Keller. I love this book. It’s a great book about prioritizing and really focusing on what’s important in the moment. That’s what we’re trying to do with this planning system.
In the last lesson, we spoke about a 10-week goal of the first of June 2023 (or whatever your preferred 10-week date is), and my goal is that I’ve built an e-commerce business that makes $100 profit per day.
What I’m going to propose for you today is that you have 10-week goals for four different projects that are important to you. These could be anything. But just as an example, you might have a business goal, you might have a personal goal, and you might have an educational goal.
The business goal we’ve already set is something we discussed. The personal goal could be something like, “I want to teach my daughter how to count to 100 in Spanish and English,” “I want to lose 10 pounds,” or, whatever it is, it might be an educational goal as well. You don’t have to do this, but this is what I tend to do.
At any given point in time, I probably had four or five different goals, or big objectives, that I’d been chasing over a 10-week period. That’s the action item for today.
Using the SMART system, set several goals specifically for a 10-week period. I just wanted to give you a bit of an overview so you can see what the planning system is all about and how it’s a critical path, and to get you to write a couple more goals and remember to use the framework that we spoke about in the previous lesson.
Make sure those goals are SMART. From now on, for the next 10 weeks, and then in the next lesson, we’ll start getting more granular with that. I’ll show you how you can start to turn this into a critical path.
Lesson 9: Tasks
In the last lesson, we started thinking about three different goals—three things that you could focus on over the next 10 weeks—to be able to build that critical path. In this lesson, I want to drill down a little bit further and really start this process of building a critical path.
The first thing we need is a big list of tasks that we can use to guide us—things that we need to check off along the way. So what we’re trying to do here is make a big list of every action item that needs to be completed to or along the way towards achieving the goal that you’ve set for yourself for the first 10 weeks.
Now, these action items—or these tasks that you’ve written—should be something that is measurable in the sense that you can say to yourself, Yes, I’ve done that, or No, I haven’t done that. Try to avoid writing ambiguous or subjective goals. It’s either done or it’s not done. To start with, what I want you to do is create a big list.
So essentially, brain dump anything that comes to your mind. Write that down on paper for each of the three different goals. If you just want to do this for one of your objectives to begin with, that’s absolutely fine. I like to do it on the spreadsheet. In fact, I’ll show you that spreadsheet in just a minute. These are the tasks that will lead you to a goal over a period of 10 weeks.
The objective is to specifically (and ruthlessly!) focus on the goals and tasks that are required.

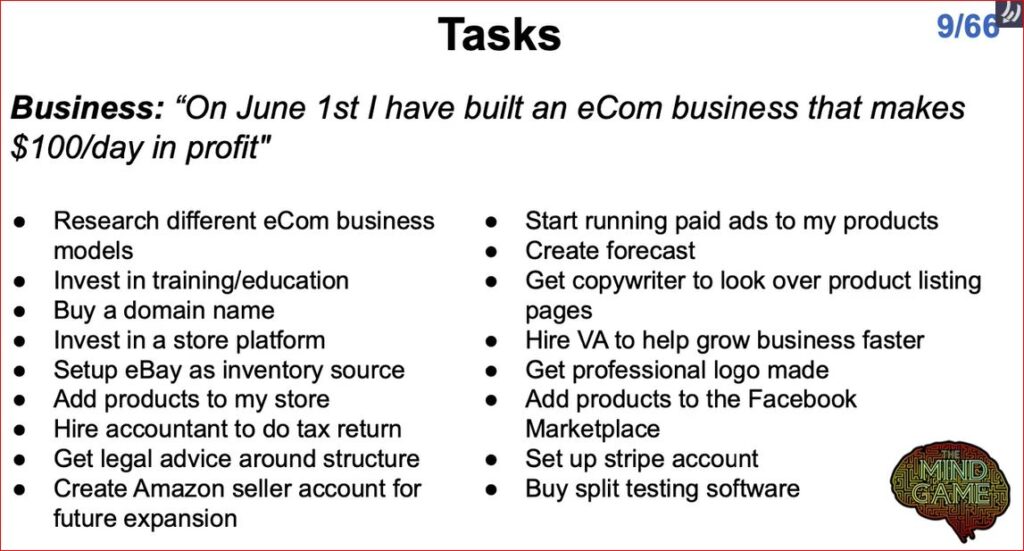
Here we’ve got three different goals and a bunch of tasks associated with each goal. These are things that need to be done in order to be able to get to the goal that I’ve set for myself. This is not an exhaustive list. This is just a starting point, really the idea that you would grow this list out.
The more you know about a topic, the easier it is to create an extensive list. But sometimes, when you’re starting out, you don’t know all that much about what you need to do, so you just make a start, and anything is better than nothing!
You don’t have to use a spreadsheet, though. You could just as easily do this on a piece of paper.
Here are the tasks required to generate a $100 per day profit from an e-commerce business, which is our first goal.
With that set of tasks, we then eliminate unwanted tasks or those that are not mission-critical and don’t need to be done in order to reach your goal.
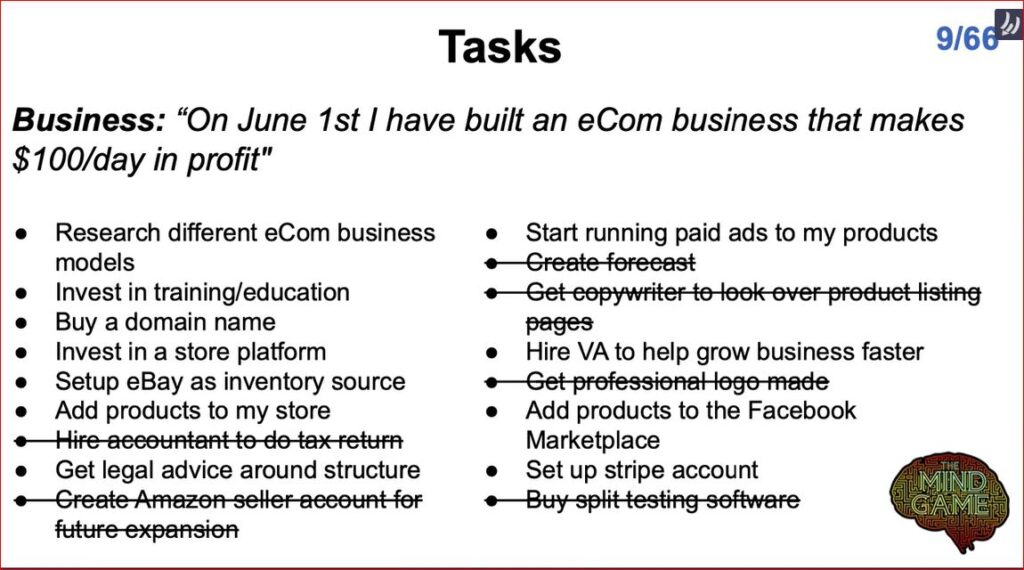
So, for example, you don’t need to hire, and you’ve got that to return in the first 10 weeks of your business. You don’t need to create an Amazon seller account for future expansion in your first 10 weeks. You don’t need to copyright or get a copywriter for every product page; you don’t need a professional logo.
What we’re trying to do in the first 10 weeks, if this were the case, would be to push forward almost with a minimum viable project, so just to do the bare minimum required or the absolutely essential items required in order to achieve that goal.
What we’re also trying to do here is remove some of the fluff so that we can focus on fewer things and really make sure we’ve got that laser focus. Then we want to put this in a spreadsheet to list out what the tasks or tactics are—things that you need to do. Don’t worry about who’s going to do them. Don’t worry about the order they have to be done in; just go about creating a big list of tasks.
Now you’ll see one thing that I do here: I add a tag to the start of the task that ties back to the project. So this is the e-commerce project. I put an “ECOM,” and then what the task is: I had a personal project for one of my kids, so I put “KIDS,” and then what the actual task was that I needed to do, and again, scribbling these out on a piece of paper is fine. You can use a Word document. You could write it in an email that you sent to yourself. Whatever you want to do is absolutely fine.
I’ll show you how you can collect all of these into one simple place in the next lesson. So the extra item is to flesh out all of the tasks that need to be completed in order to hit your 10-week goal—as many of them as you can. If you don’t know what the tasks are, just have a guess. It’s better to have some things to start with than nothing. Again, you don’t have to know what the order is or anything like that just yet. We’ll get to that very shortly.
Here, just do what you can, and we can add more tasks to this as we progress. This is just a starting point where we start adding tasks that we can then plug into our 10-week plan.
Lesson 10: Build Your Critical Path

In this lesson, we’re building on what we’ve done in the past couple of sessions and really getting to the point of fleshing out a week-by-week plan so that you know for the next 10 weeks exactly what you need to be doing on a week-by-week basis in order to systematically go about achieving your objective.
In building a critical path, there are a few different things we need to take into consideration. One is the order of the tasks: there are some things that have to be done first and some that can’t be done immediately but have to be done later.
Now, you don’t necessarily have to do everything yourself. Maybe you’ve got a team. Maybe you can hire someone; maybe there’s someone else you can leverage to help get you moving forward towards your goal faster.
Each task needs to have a due date. Then, once we’ve got all of the tasks, we want to combine them from the different projects. So maybe you are working on multiple goals at the same time. We want to merge them together into one place so that in Week Number 1, we know what we’re doing toward our business goal. We also know what we’re doing for a personal goal. Maybe you’ve got an educational goal, or perhaps some other goal as well.
All of those goals are then condensed and combined into one so that you can see all your tasks at a glance. I like to use a spreadsheet for it. You may also need to adjust your goals.
For example, sometimes there might be weeks when you can work more on your business and your goals than other weeks, and that’s fine; you might be able to adjust the plan more easily and make sure you’re doing more tasks in those weeks.
Then there might be other weeks when you just can’t do any work on your business or your goals. Maybe you’ve taken a vacation or something and you’re not going to be able to be at the computer, or it could be anything. If that’s the case, you can move tasks out of those weeks.
So I find it to be a really systematic way to approach this, and it allows you to adjust and optimize things on the fly while having this overarching framework to follow to get you there. There are some goals, or tasks, that you’re going to be doing every single week as well. They call these ongoing tasks.
Now, the way that I look at the week’s tasks is on a Monday-to-Sunday basis. So if I have a due date of Sunday, the due date for each set of tasks is always Sunday. then we roll over into another week.
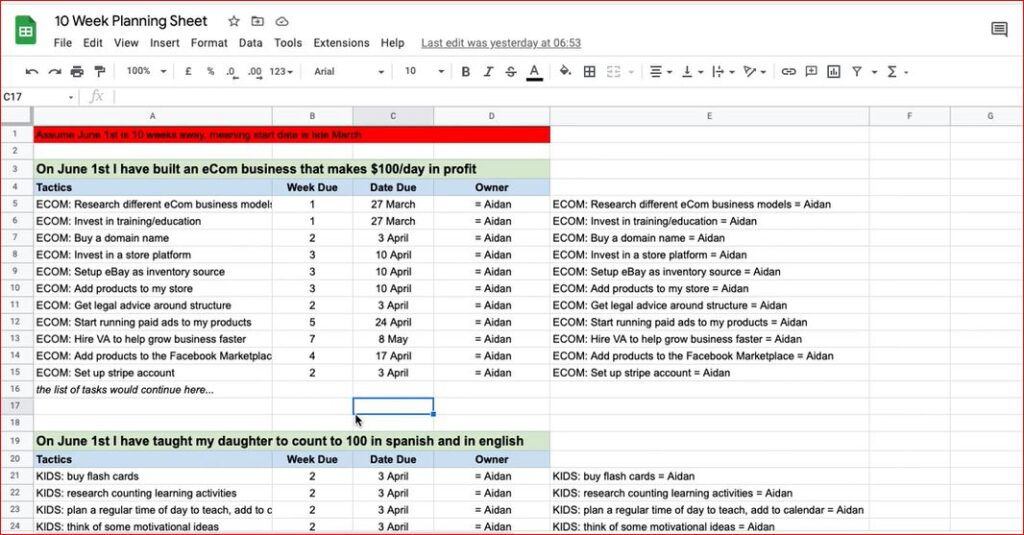
Here we’ve got a list of tasks, and I started talking to you about these in the last lesson. But now I’ve written a due date for each of those tasks, and by doing that, what I’ve done is put them in order.
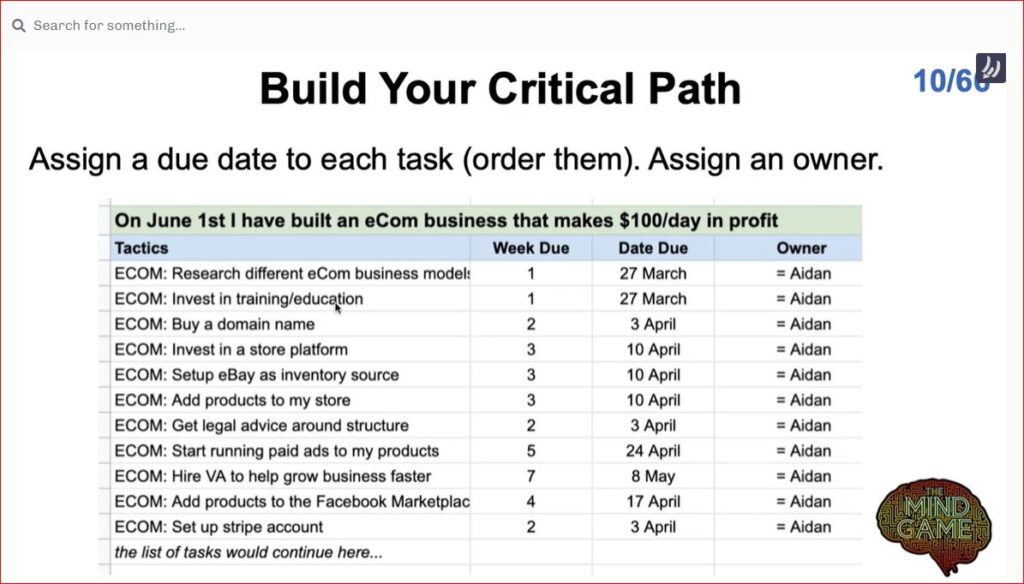
Week number one is the end of the first week in the 10-week plan. Week number two would be the end of the second week and plan, and that specific due date is on the Sunday of that week. So just when I was planning out this example, the Sunday of week number one was the 27th of March It doesn’t matter when that is. I mean, it’ll depend on when you’re reading this lesson, and this information is timeless, so it doesn’t really matter. But I’m sure it works!
My first task is to research the different e-commerce business models. If I don’t have a business model that I can use already, find the best one and invest in some training and education. That would be the very first thing I had to do.
Then I would probably have to buy a domain name and maybe set up a Stripe account where I would be taking payments. I might need to get some advice as well around legal structure. I’ll share a link with you about where you can find legal advice.
In the final column, we’ve got the owner. In this case, I’ve put myself in charge of every single task. But if you’ve got a team or a partner, there might be some things that you could assign to someone else. So, for example, buying a domain name—maybe that’s not something you’re going to do. Maybe that’s something your partner’s going to do. So you could put their name in there.
The overarching critical path spreadsheet has 10 different columns. There is one column for each week, and the Sunday due date is in each column as well. So for week number one, the Sunday would be the 27th of March, just based on when I’ve set this up and when I’m writing about this lesson.
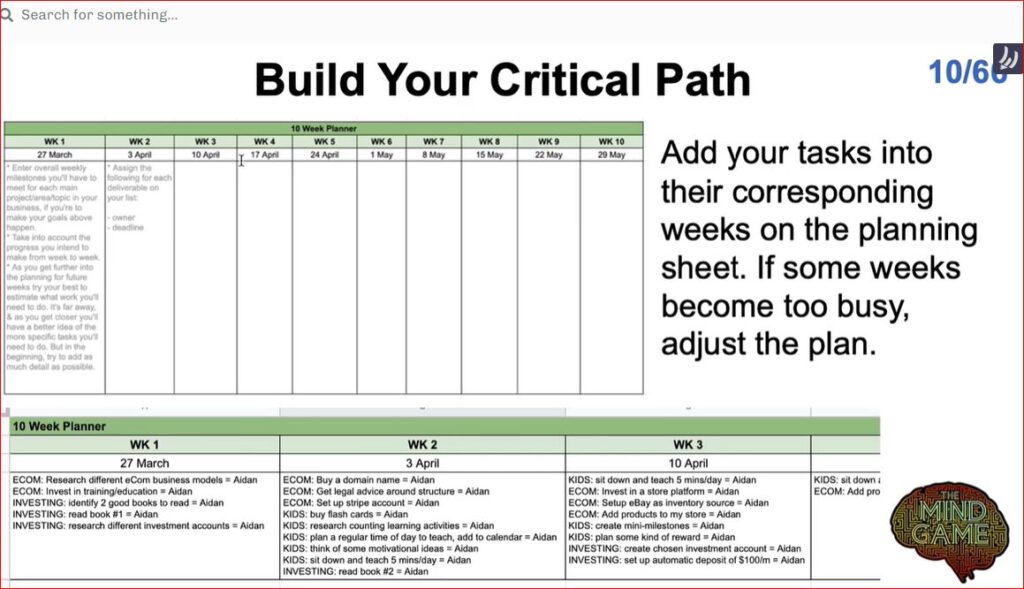
Then we want to put all of the tasks that are due in week number one in the cell under the date ‘27th March’. You can see here that I have multiple different tasks, and they’ve all got the due date of March 27th in this case.
This is the template that I have used for many years now, and I find it to be really good. Now, this is a 10-week planner. You could conceivably make this a 15- or 5-week planner, but I think 10 weeks is a sweet spot.
I have a few tabs in this spreadsheet; this one shows the goals and the associated tasks to be completed to achieve the goals.
This spreadsheet has columns showing the week due, the date due, and the specific owner.
So we have a list of tasks and a timeframe to move forward with. For example, if it happens that you have far too many tasks in one week, you could take some of them out and put them in the following week or in the previous week.
If you knew that in week five you were going to be away on vacation, you might take all of the tasks out of that. We can distribute them into Week Four and Week Six accordingly.
I’ve found it to be a fantastic system for managing time and various projects by using this critical path process.
So the first action item here for you today is to put the tasks that need to be completed for your goals in order and assign each task a due date. The second action item is to assign an owner to each task. Now, if you’re working on your own, you’ll probably be the owner of every single task. Action item number three is that once your tasks are in order, you should add them to the planning sheet.
Lesson 11: Plan for Next Week
We are making fast progress on our plan here and working through adopting many of the habits that are going to bear results in your work and personal life.
Lesson 11 is all about making more progress and getting even more successful. In the last lesson, we spoke about the 10,000-foot overview of a 10-week plan.
In this lesson, we will focus specifically on creating a plan for the week ahead. So this is something that you want to do before the week starts. If the week starts on Monday, then you want to make sure that you’re doing this on Sunday at the latest. It’s not something that you really want to be waking up on Monday morning and thinking about.
I like to use Google Calendar for this, just like I use Google spreadsheets for my plan. But you can use absolutely anything. It doesn’t matter. You can write it down on a piece of paper or use some other kind of calendar.
The objective today is to map out and allow for time in your plan to get work done and to get the things done that are going to get you towards reaching your objectives. So this will include adding things to your calendar or your weekly plan. There might be something like focus blocks or a block of time when you can work on a certain task.
In future lessons, we’ll talk about how you can add buffer blocks and miscellaneous blocks as well, and I’ll show you what they are.
Now, I do something every week called my 10 out of 10 list. My 10 out of 10 list are things that, if I achieve them, will make my week a 10 out of 10 week, the perfect week that I could have hoped for the prior week.
So in my 10 out of 10 list, I’ll typically have a handful of tasks—perhaps six or seven different tasks—that I want to get done that week.
These will be the most important things, and they will be aligned with the tasks that I’ve got on my 10-week plan, perfectly aligned, like those dominoes that I showed you in the image a couple of lessons ago, and this is something they want to have done by Sunday of each week.
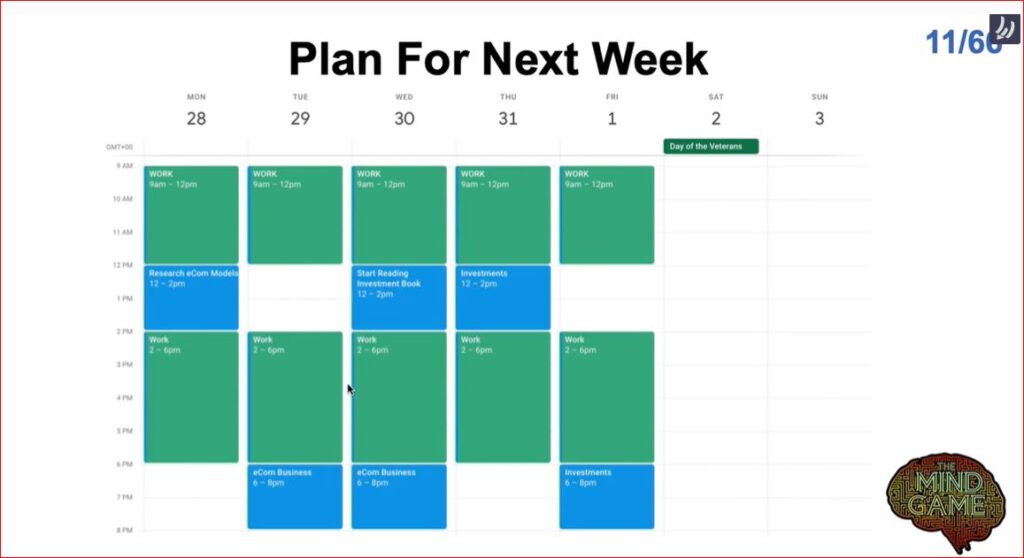
So this is an example of a Google Calendar. This is how I typically map it out. If you’ve got a day job, then all of these green blocks here may represent when you are actually working and your day job. Obviously, you can adjust this kind of thing for your own needs.
But in this hypothetical example, what I’ve got here is that the blue blocks are the blocks when I’m focused on doing things that are related to my 10-week objectives, my 10-week goals. So here you can see I’ve got a block on a Monday between 12pm and 2pm where I’m going to be researching different e-commerce models. That task is like a mini-goal in and of itself. It’s a mini-milestone.
I want to have finished doing my research and have actually chosen the best e-commerce model that I would want to use in that block of time.
There’s another block of time from 6pm to 8pm on Tuesday, and that’s where I’m going to be working on my e-commerce business, and that’s where I’ll be starting to do, or execute, a lot of the tasks that I’ve got on my list, and the same for the following day.
Remember, we’ve got multiple different tasks that we are focusing on here, with three different objectives: personal, business, and educational. So I’ve got other blocks dedicated to the other projects as well: start reading an investment book; work on my investments on Friday as well.
Of course, you can get a lot more sophisticated with this, and in the future, I will talk about using things like buffer blocks and miscellaneous blocks to allow for miscellaneous things. I’ll also talk to you about how you might change this plan if you are available every day to work towards your objectives.
You might do this a little bit differently. The underlying rules are exactly the same, but you may just structure things a little bit differently, and obviously you’ll be able to get more done.
Planning for the next week means noting down on the calendar when you’re going to do certain things. For example, if you had a fitness goal, maybe you’d be training on a Monday or Wednesday, a Friday or a Saturday, and it might be one hour per day, and you’d actually put that into your plan.
This might seem trivial, but when you do this over a 10-week period, those gradual progressions that you’re making are what are going to make all of the difference and allow you to reach your goals.
I like to use Google Calendar, but any kind of planner is fine. If you prefer to write things down in a diary, that’s also fine. I actually do this as well, so I use Google Calendar, but I’ve got that blue notebook that I shared previously, and in that blue notebook, that’s where I write down my 10 out of 10 weeks and what that will look like Again, it’s typically a handful of things, maybe six or seven different things that are aligned with my tasks, but may include a couple of other things as well.
Also, I might have a couple of other miscellaneous things that I need to get done during the week that I add to this that are not necessarily related to the objectives that I’ve mapped out. It’s almost like creating a to-do list for your week, if you like. The intention is to simply block out the time ahead of time for important tasks that need to be done in the coming week.
So that’s why, in addition to the Google Calendar, I also use a daily calendar for daily planning, and we’ll get more into that in the next lesson.
So the action item for today is to allow or to add blocks of time to your calendar for the week ahead, for when you’re going to be able to spend time working on your tasks. Those tasks are aligned with reaching your end objectives.
So take a look at the week ahead. If you use Google Calendar or sketch it out on a piece of paper, note down what some of your time commitments are and figure out when you’re going to be able to spend the time on your business.
This is a little commitment that you’re making to yourself, and it doesn’t just have to be your business; any of your goals are going to help you get more done and push you towards reaching your goal.
In the next and final lesson in this article, we’ll talk about how we can get even more granular!
Lesson 12: Plan for Tomorrow

Today, we’re talking about planning for tomorrow. We’re getting even more granular with the plan, and I want to share some ways that you can get some easy wins.
The plan for tomorrow is about making a to-do list, but it’s a very, very strategic to-do list, and it’s a powerful to-do list because it’s aligned perfectly with where you want to get to in the future with your 10-week goals.
I like to use a notebook for this. I’ve tried lots of different things. I’ve tried making lists on digital files, like on my computer, but the thing that works best for me is just my little notebook. But figure out what works best for you and just use that.
This is something that you want to be doing the day before. The idea is that you don’t want to be waking up in the morning and then writing your list on the morning of the day you actually do the tasks. If you do that, it’s better than nothing, but it’s not quite going to have as much power as if you do it the day before. In fact, this is something that I typically start filling out days in advance.
So if today was a Wednesday, for example, I might already be writing things in my little notebook that I need to do on Friday, just as things come to mind, so I don’t lose track of them. This allows me to get some really easy wins.
The three big ones that I see are:
- Writing works to add your list to both your conscious and subconscious parts of your mind. So by doing this the day before or the night before, or at least prior to the current day—prior to today—then it starts adding it, building it, and working it into your subconscious while you sleep and during the day.
- It will mean that you won’t have to procrastinate. You’ll be able to hit the ground running, so you can eliminate some of that procrastination risk. What I find is that it allows me to rest better at night because I don’t have all this overload in my mind or am not concerned that I will forget to do that tomorrow. I can just set that aside because I’ve already written it down in my notebook. I know what I need to be doing, and I use asterixes to outline the absolute mission-critical, most important tasks, and I share what they are with you in a moment.
- If we just think back to the underlying framework that we’ve been talking about all along, it’s that your thoughts lead to your behaviors, and your behaviors lead to your results. This is perfectly aligned with those concepts because we’re putting our thoughts down on paper, and they are ultimately going to dictate the behaviors that we’ve got the next day, and then that is directly correlated to your results.
So it does all make logical sense in my mind, at least anyway, and this is something that I do every single day. Like I said, it’s a very strategic to-do list aligned with a bigger goal.
The 10-week planner plus the daily plan really are my secret weapons to getting more done. Now you might be able to see in my little photo there a photo of the notebook and an example of just one of my days and what it looks like.
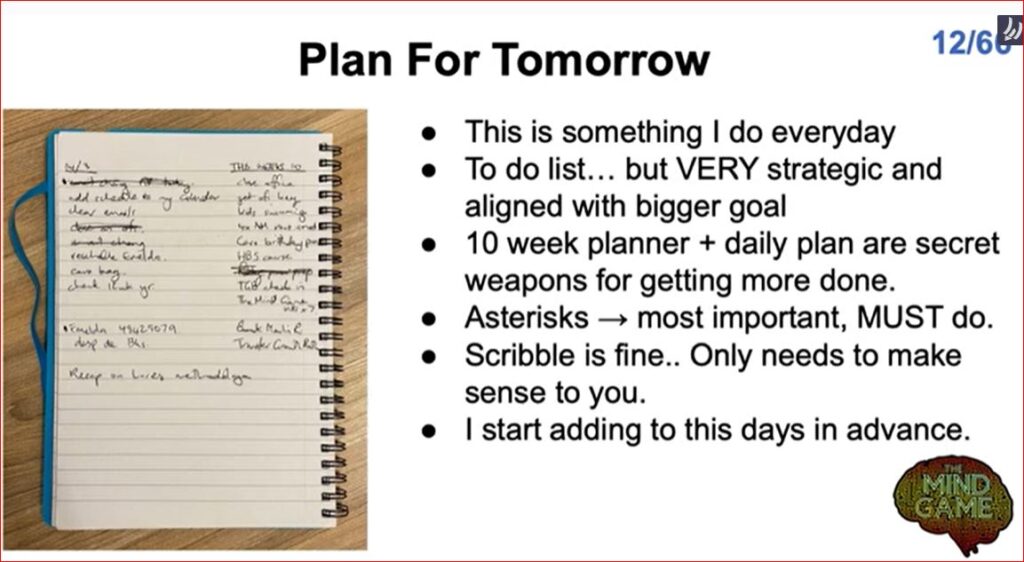
Sometimes it’s more fleshed out than this. Normally, it has at least this much in it. But as you can see, on the right-hand side of the notebook, I’ve got my 10 out of 10 tasks for the week, so there are a bunch of different things on there. They were personal things, and I know what they mean, but if you were reading them, you might not understand them. Some of them are obvious, like kids swimming.
So you can see I’ve got my date there, and then the daily to-do list on this side here. It’s more about the right-hand side: the 10 out of 10 tasks and things I want to nail this week, to be able to say at the end of the week that it was a great week for me.
The whole objective is that you just start using this. So the action item is to write the list of tasks for the day ahead. Make sure they are aligned with your goals and reflect the action items on your 10-week planner.
This is all designed to get that domino effect going, where you’ve got that long-term objective, and you’re getting a little bit closer to it. As you get closer, you get more granular with the tasks, and that’s why we are creating a daily planner here.

Over the past few lessons, we’ve been getting very operational. We’ve been getting very much into what you need to do, step by step, to build out a plan, to build out a critical path, to add things to your calendar, or to build that calendar in the first place. We’ve been talking about to-do lists, ways that you can use them, and how you can get that to-do list working for you in a more strategic way.
There is so much more to the Mind Game course. We’ve only touched on the first 12 lessons in this 2-part series. I hope this information is as valuable to you as it has been to me. For more information, go to The Mind Game, where you can see all 66 lessons!